Remember the code you wrote in your last data science project for replacing certain values appearing in a feature with another unified value?
If you don’t, this post is for you.
If you do, will you be able to write the exact code every time, again and again for every project you undertake?
If you can’t, this post is for you.
If you can, do you think it’s an efficient move, having to write the same code snips over and over again for every project?
If you don’t think so, this post is for you. If you think so, you might be driving on the wrong side of “Writing Clean, Readable and Reproducible Code for Data Science”.
Through this post, I shall provide an understanding of one of the most commonly overlooked tools in data science projects, “Utility Scripts”.
What is a Utility Script?
Utility scripts in the context of your data science project can be thought of as small, simple snippets of code written as independent code files and stored within your project environment. Usually, each script is designated to perform a particular task. For example, you can have a file titled clean_data.py which does (yes, you guessed it!) data cleaning. Within this script there can be several other functions. In the case of clean_data.py, possible functions could be rename_columns(), drop_miss_vals() etc.
Why use a Utility Script?
The fundamental question to ask before proceeding forward is, “How do we usually write code for our data science projects?”. By skipping over the matters of whether we use notebooks or scripts, or whether we code in R or Python, a more concrete way of discussing about this would be as follows.
We write code for our data science projects in a way where more often than not, we trace back to projects that we have worked on in the past, pick up code from those projects and use them in tandem with the fresh code we are writing for the current project.
So, essentially code once written is not forgotten after the project. It continues to be of help to our activities in the future.
In fig. 1, the red rectangle indicates code that can be reused(or rather, will have to be reused) from an old project. The black rectangle indicates code that is new to a particular project and specifically works for that project alone.
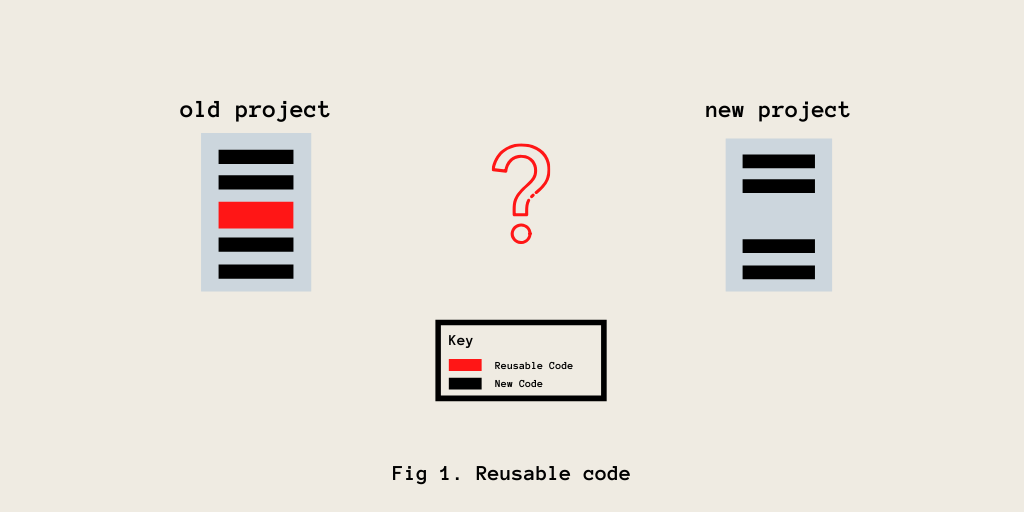
As depicted in fig. 1, if we are to work on the new project, how can we reuse the code from the old project in our new project? An intuitive, more obvious way to do this would be to Copy-Paste the reusable code into the new project. That works well as it is easy, quick and simple. But, it is to be noticed that this method that seems like a quick-fix also has the usual disadvantages of quick-fix methods.
Like all quick-fixes, this is not meant to address the larger issue and is only a temporary solution. It seems like a time-saving option, but in reality it eats away a huge chunk of our time in the long run.
What Issues persist with the Copy-Paste Method of Reusing Code?
There are 3 main issues that often occur when we try using the copy-paste method for reusing our code from past projects :
-
Finding the code
It happens very frequently that we remember that we had written code for a specific task once, but we have no memory of where that code is stored. We do not remember the previous project where we had used it and hence, it becomes difficult to find the relevant code snippet.
-
Project moved from location or deleted
If we have been unable to maintain our past project and keep track of its location(due to any issue), it means that we lose out on all the reusable code that was written for that particular project.
-
Having to rewrite code
This is an issue that pops up if we fail to find the reusable code snippet. In such a case, we will have to rewrite the necessary code again which includes a lot of research and googling from scratch. Even if you remember what you wrote and know exactly how to write it, it still is not a quick job in being able to create robust code.
If you have faced these issues in the past, it becomes so much more easier to perceive the reason why we need to look towards a new method to maintain and use reusable code in our data science projects.
Another reason to have utility scripts
Now an important question here can be,
“Why write separate code files(or utility scripts) with these functions when we can have them in our main program file itself?”
A simple answer for this is that, “Having too much code in a single main program is not the best way to organize your project”. Such a singular program file structure
- Introduces clutter
- Lacks abstractions and displays unnecessary detail
- Does not allow for reproducible analysis
This is another reason why we need to replace the copy-paste methods that we use usually, with the method of writing utility scripts.
Using a Utility Script
Having pierced the armour of the copy-paste method in the previous section, it becomes more important to finally introduce the usage of utility scripts.
Reiterating myself, “Utility scripts in the context of your data science project can be thought of as small, simple snippets of code written as independent code files and stored within your project environment”. It is better to write these scripts in a way that a particular script takes care of a particular type of task associated with your project.
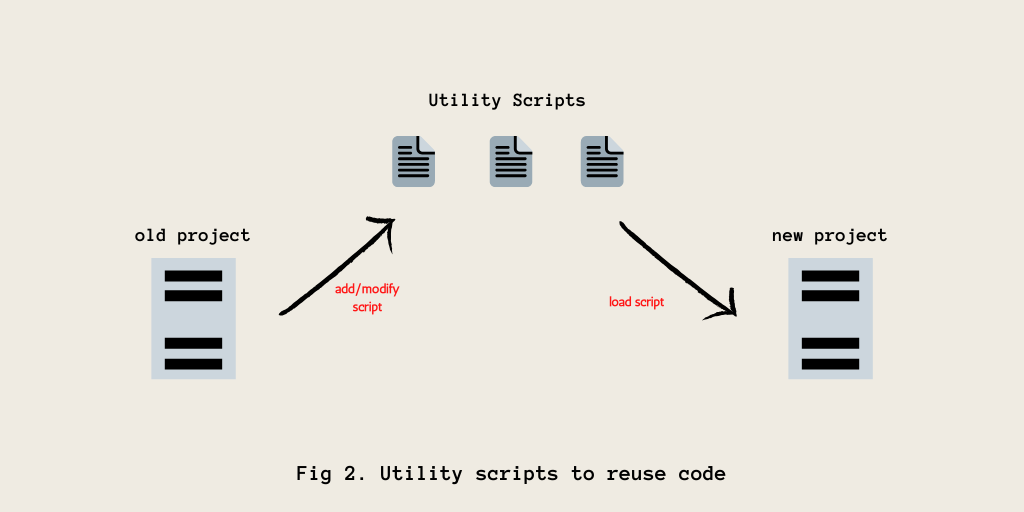
As depicted in fig. 2, utility scripts contain code snippets that have helped in past projects to perform a general task which is helpful across different kinds of projects(eg: renaming columns in a dataset). These scripts can be loaded onto newer projects as and when there is a requirement to do so. In this way, the utility scripts’ location acts as a central repository or storage for functions that you constantly use across your projects.
An Example of a Utility Script
This is an example of a small utility script that helps performs the task of splitting a single .csv dataset into
- Training data with target labels (train.csv)
- Testing data without target labels (test.csv)
- Testing data’s target labels (test_solution.csv)
NOTE : If you wish to reuse this utility script, you might have to make a few changes in the dataset paths.
"""
Task : To perform preliminary data operations with raw data even before data
       cleaning

Functions :
    > train_test_split
"""

import pandas as pd
import os

# Global Parameters
RAW_DATASET_LOCATION = "../data/raw/"
CLEAN_DATASET_LOCATION = "../data/cleaned/"

def train_test_split(file_name, target, test_percent=0.20, random_state=42):
    """
    Splits a whole dataset(.csv) for ML into train.csv, test.csv and
    test_solution.csv
    ----------------------------------------------------------------

    PARAMETERS:
        file_name : Name of the whole dataset stored in "../data/raw/" (string)
        target : Name of the Target feature (string)
        test_percent : Percentage of data to be placed into test.csv (float)
        random_state : Constant to make the results reproducible (integer)

    OUTPUT:
        Stores train.csv, test.csv and test_solution.csv in "../data/cleaned/"
        train.csv -> Training Data
        test.csv -> Testing Data without target feature
        test_solution.csv -> Testing Data target feature

    CONSTRAINTS:
        Only .csv files are allowed
    """
    DATASET_NAME = file_name[:-4]

    # Load the file
    try:
        df = pd.read_csv(RAW_DATASET_LOCATION + file_name)
    except:
        print("File Not Found!")

    # How many rows to take to test data?
    num_test_rows = round(df.shape[0] * test_percent)
    print(num_test_rows)

    # Split the data into training and testing data
    test = df.sample(n=num_test_rows, random_state=random_state)
    train = df.drop(list(test.index)).reset_index(drop=True)
    test = test.reset_index(drop=True)

    print("Train Data Shape:", train.shape)
    print("Test Data Shape:", test.shape)

    # Store Target values of test separately and remove them of the main dataframe
    test_target = test[target].values
    test = test.drop(target, axis=1)

    # Make the submission dataframe
    # This is the final values with which we have to
    # compare our predictions on the test dataset
    solution = pd.DataFrame({target:test_target})

    os.mkdir(CLEAN_DATASET_LOCATION + DATASET_NAME)

    # Store the files back as train.csv, test.csv and submission.csv
    train.to_csv(CLEAN_DATASET_LOCATION + DATASET_NAME + "/train.csv", index=False)
    test.to_csv(CLEAN_DATASET_LOCATION + DATASET_NAME + "/test.csv", index=False)
    solution.to_csv(CLEAN_DATASET_LOCATION + DATASET_NAME + "/test_solution.csv", index=False)

    print("All datasets have been generated and are available at "+ CLEAN_DATASET_LOCATION + DATASET_NAME)
How to Load Utility Scripts in Python
Having shown you an example of utility scripts and discussing in detail about why you should use one, it is important to now provide instructions on how to load theses scripts onto your main programs. Consider the utility script provided in the previous section (train-test split one). Let’s assume this file is named train_test_split.csv. Also assume that the project environment that you are working in is structured in the following way :
- project_name
- src
- main_notebook.ipynb
- utils
- train_test_split.csv
- src
NOTE : The above structure is a very inchoate way of designing a project hierarchy and should never be used in practice. However, it is a fairly simple structure for explaining the content of this article and hence it has found use here.
The main_notebook.ipynb(in src) is the jupyter notebook in which the analysis and machine learning modelling is performed. Our utility script resides in a seperate utils subdirectory within the project’s main directory. Both src and utils are sibling directories.
To use the utility scripts in the main_notebook.ipynb, enter the following code snippet in along with the other standard imports at the beginning of the notebook.
import sys
sys.path.append("../utils/")              # appends the files in utils
import train_test_split as tts            # imports the file with an alias
The sys.path.append() function appends all the utility scripts (in the utils subdirectory). After that is done, each script can be loaded by using the file name without the .py extensions. This is similar to how we usually load standard libraries like pandas or numpy. The argument to the sys.path.append() will change based on where your utility scripts reside.
If your utility script file and main code file is in the same directory, you could just have the following line of code in the main code file to use the script. However, such a directory structure is not good for separating the utility scripts and the main code file.
import train_test_split as tts
Advantages of utility scripts
Utility Scripts are great ways to ensure that
-
You don’t need to re-write the same code for every data science project
-
Your projects have a kind of structure to work with
-
You can save time by not doing routine tasks again and again
When to make a utility script and when not to do so?
In spite of all the advantages utility scripts provide us with, it is to be noted that creating utility scripts that help simplify our data science tasks is a meticulous job that requires careful planning. In the following cases, you might find difficulty in your projects even though you have utility scripts in place :
-
Haphazardly creating new scripts for every kind of task we perform in your projects without identifying if those tasks can be generalized or whether they have already been created in the past. For example, I was once in the habit of creating utility scripts for every small functionality I required in projects. Owing to this habit, I ended up creating close to 15 separate python scripts as utilities and figured out that only around 5 of them could actually be used in other projects too. In fact, around 6-7 of these scripts even had redundant functions!
-
Getting too excited about creating our own utility functions that we fail to see if there is a package or library that does the same already available on the internet. Many libraries and packages are available as a part of open source distributions and lot of them actually cover the tasks we want to be doing in our projects. So if it already exists, it does not make sense to create them again.
“Code, but verify if it already exists or not”
-
Not spending time on documenting your scripts. It is very easy to create a script, make it work and then forget all about it. But, we all forget. It’s normal. However, what would really hurt is when we go back to these scripts at a later stage and have no clue about their functionality because we forgot to document our code when we created it.
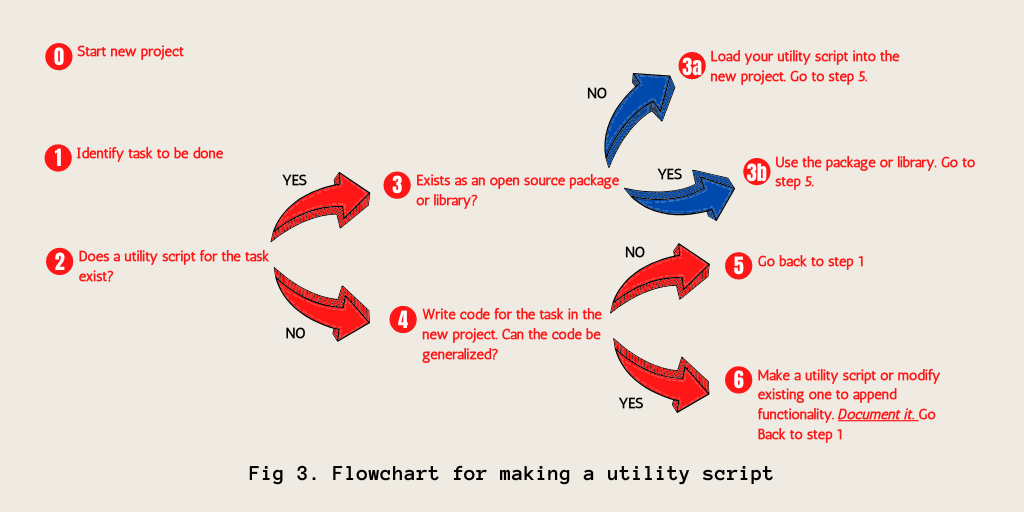
In fig. 3, I depict a common thinking process I adhere to when I write my utility scripts to ensure that the issues above do not arise. Hope it helps you.
Inspiration
This wonderful youtube video on using utility scripts in kaggle by Rachael Tatman was what introduced me to using utility scripts for my data science projects. If you wish to know how you can use utility scripts on Kaggle, this video is a must watch!
Conclusion
In this post, I have summarized key points on what utility scripts are, why we should use them and how we should be using them to maximize our productivity while working on data science projects. The article has been written based on my most favourite productivity hack when it comes to working on data-related projects.
If you got any productivity hack that you regularly use to make your work more efficient, do let me know in the comments!